Sunday 26 February 2012

Red Bed


Steve and I haven't had a "real" bed since we lived in Montreal over two years ago. We have been sleeping on mattresses on the floor since we moved back to Melbourne.  A week and a half ago, Steve painted the bedroom white- spurring us to completely organise and make-over our bedroom.


We bought a bed frame for cheap from Gumtree about a week ago. It was in the Dandenong Ranges so we asked my Dad to drive over and pick it up for us. In the picture it looked like a nice carved wooden bed. In reality it was a humungous 70s dark wooden bed with games of naughts and crosses scratched into it and a giant wooden headboard.

When we got it into our house, we realised it wasn't going to fit in our bedroom which is quite small.


The frame retired to the front yard where it sat for a few days in the sun, looking miserable. I kept thinking about it and what it could have been, when eventually I came up with an idea for a compromise.

Steve began by sledgehammering off the posts and sanding them down. Then we painted them with some leftover red paint. Because it was a scorchingly hot day, the paint dried almost immediately, so we did three coats.

Then we attached a panel of wood on each side and drilled the slats down. We reinforced both the head and foot of the bed with a bit of wood from another old bedframe. We ended up using the original foot of the bed as the headboard. It has a star scratched into it and I think it looks cool, and it's a reminder of what the frame once was.


I love sleeping in a real bed again! (So does Mika)


Tuesday 21 February 2012

How to Make Elbow Patches


I have had this cardigan for probably about six years and it has gone through a lot. Several trips overseas, two Montreal winters and lots of accidental felting in the washing machine. It had been on my darning pile for ages due to holey elbows, so I decided to take some time to make a tutorial. It's my first time, so please let me know what I could improve on in the future!


Step One: Cutting out your patches.


You want to make sure that you choose a nice strong fabric for the patches. I have used some upholstery weight crushed velvet from some old curtains. You can be inventive with this part- you could use vinyl, leather, felt, velvet, Mexican oil cloth or even canvas.

The second fabric is for the back of the patch, it needs to be something thin and easy to manipulate, like this lightweight blue cotton I have used.

Depending on how big the holes or weak spots on the elbows of your garment are, you can make the patches as big or as small as you would like. I just used an oval shape, but you could do love hearts or triangles or squares or circles!


 Step 2: Pinning your fabric.


I am a big advocate of pinning before sewing, especially when you are working with two fabrics of different weights. Just pin around your pieces, right sides facing as you will be sewing them together and then turning them inside out.


Step 3: Machine stitching!


Machine stitch around the edge of your pieces- making sure to leave an opening about 6cm long, so you can turn your patch inside out.


Step 4: Pinking or alternatively, cutting notches.


Because I am all for shortcuts when I am sewing, when I need to give my seams a little bit of allowance, instead of going around cutting notches into my curved edges, I just cut them with pinking shears. I find that when I am working with heavier fabric, it provides a more streamlined shape.


Step 5: Turning your pieces.


When you have cut your "notches", turn the pieces inside out, and smooth them down. You will find that the lighter fabric conforms to shape of the heavy fabric.


You will also notice that you still have openings in each patch.


Tuck the opening into itself as demonstrated here:


And pin it down.


Step 5: Placing and Pinning.


Have a look at the area you are patching and place the patch over any holes or weak spots that appear, pinning with quilting sized safety pins.


Step 6: Hand stitching.


Thread your needle with an appropriate (or inappropriate) colour of cotton and stitch around the patch, mainly sewing through the lighter fabric, and letting the heavy fabric sit on top. Be sure to slip your free hand through the sleeve and hold onto your stitching from the back, so as not to sew through both layers of fabric! Stitch around each patch and tie your thread off on the inside of the garment.


And there you have it! 

Now you can lean on stuff with your elbows to your heart's content.


Saturday 18 February 2012

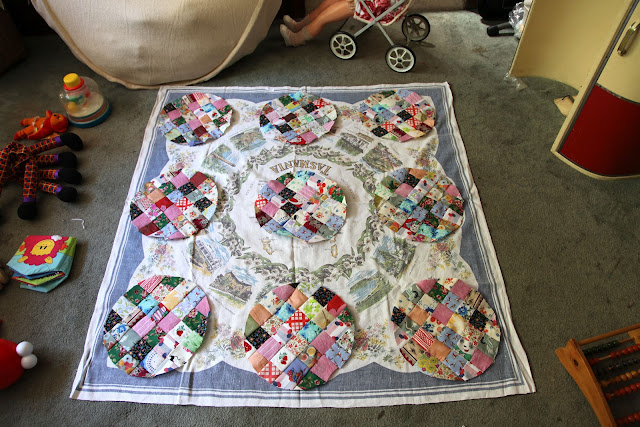
Tasmania Quilt


I cut out the squares for this patchwork quilt when I was about five months pregnant, and put them away because it seemed like such a daunting task to sew them all together.

Recently while cleaning out my sewing desk, I found the box with all of the cut out squares and decided just to experiment a bit with them. I started sewing rows of six which became squares of 36 and before I knew it, all of the pieces had been sewn up and I had 9 big patchwork squares!


When I placed them on the ground, I realised they would probably sew up into a cot-sized quilt. Which is fine for a little baby, but not quite adequate for an almost-12 kilo toddler.

So I found an old touristy Tasmania tablecloth with Australian animals on it and arranged the squares on that. Although it didn't look right. So I cut the squares into circles and it really worked.

I used this tutorial to make my circles extra perfect and neat.
Although if you wanted the circles with less work, you could use this one.


For the backing, I used some children's curtains I bought a while ago at an op shop, they have Australian and African animals on them... so weird!


I used some leftover squares to make the binding on two edges, it worked really nicely, I'd like to use this technique on some clothing one day.
I hand quilted around the circles and the border with crochet cotton, as it was too thick to machine sew. The thing I love most about this quilt is that I have used most of these fabrics in previous projects and I even made the pink felt when I was seventeen. 
Overall it was an enjoyable and enriching project, and I feel compelled to try something a little bigger next time!


Disclaimer: I have never actually been to Tasmania but I have some very romantic ideas of what it would be like. It seems like such a wild place, with lots of wooly beaches and deep dark woods. Someday I'll go and have an adventure there. 


Tuesday 14 February 2012

They Call 'Em Love Apples...


 Happy St. Valentine's Day!

I made these mittens out of an accidentally felted jumper this morning. I just traced around my hand and sewed them up. I've seen lots of similar pairs of mittens floating around the internet, so I thought I'd give it a try- they're sweet, I can't wait for frosty mornings in winter with a cup of coffee, walking to school.

 These tomatoes have been going crazy in the garden lately. We have had beautiful fresh tomatoes every day. They seemed to take off slowly, producing pretty mediocre fruit. But then they suddenly exploded with rich, red, delicious love apples!


Sunday 12 February 2012

Vegan Baby Shoes


I don't know if I've ever written about being vegetarian on this blog before. It's funny, because I guess I don't even really think about it all that much. I'm in my tenth year of vegetarianism and Steve is in his fourth -I did not force him to stop eating meat, he was vegetarian when I met him!

Of course with both parents being vegetarian, Casper is vegetarian until he makes up his own mind.

We try to be as ethical and environmentally friendly as we can in our house. Which includes trying not to buy new leather products and use alternative materials where appropriate.

Casper has started daycare recently and is required to wear shoes. He doesn't really wear shoes at home or when we take him out and has only just started walking. Podiatrists recommend that children under the age of two only wear soft sole shoes. I decided to make him some soft shoes out of some upholstery vinyl that I had in my fabric stash.

I used a free tutorial online that you can find here!

I was surprised that my sewing machine sewed so smoothly through the vinyl, it was actually quite easy.

I think they ended up pretty cute, albeit a little lumpy and bumpy. They sort of look like old American footballs don't you think?